一般在使用 Git 作為版本控制與部署專案時,都是使用指令居多,很少會使用像是檔案傳輸等方式部署,而且用檔案方式部署我們不太能知道哪些檔案已經傳過,或是還沒有傳上去等。
有鑑於這個問題,我們在使用只提供 FTP/FTPS 等檔案傳輸協定傳輸檔案的共享主機(shared hosting)時,可以使用 git-ftp 來幫我們完成 deployment 的任務。
本篇文章,就是要來介紹與使用 git-ftp 來幫助我們達成這項任務。
初始化一些 Git 指令的設定(環境設定)
git config --global user.email "your-mail-address"

git config --global user.name "your-user-name"

git config --global core.editor "vim"

git config --global color.ui true

git config --global alias.lg "log --color --graph --all --pretty=format:'%Cred%h%Creset -%C(yellow)%d%Creset %s %Cgreen(%cr) %C(bold blue)<%an>%Creset' --abbrev-commit --"
先建立一個 hello-world 的專案
mkdir hello-world

cd hello-world

git init

echo "<?php echo 'hello world'; ?>" > index.php

git add .

git commit -m "initial commit"
下載 git-ftp 套件來安裝。
照著 官方 INSTALL.md 加入 ppa repository
sudo add-apt-repository ppa:resmo/git-ftp
sudo apt-get update
可以參考官方的安裝教學文件,本篇使用 Linux Ubuntu 與Windows 來進行安裝。這時候可能會在 sudo apt-get update 時,發現 Package 的 source ppa 發生 404 Not found 的現象。
W: 無法取得 http://ppa.launchpad.net/resmo/git-ftp/ubuntu/dists/wily/main/binary-amd64/Packages,404 Not Found

W: 無法取得 http://ppa.launchpad.net/resmo/git-ftp/ubuntu/dists/wily/main/binary-i386/Packages,404 Not Found

E: Some index files failed to download. They have been ignored, or old ones used instead.
[Ubuntu]
為了避免這種情形的發生,因此需要自己手動安裝 deb package。因此需要自己前往這個網站:https://launchpad.net/ubuntu/+source/git-ftp
目前的新版本為:1.2.0-1 可以使用這個版本,並下載:git-ftp_1.2.0-1_all.deb 檔案。下載回來之後,便雙擊安裝了。安裝好之後,就有 git-ftp 的指令可以使用了。如下:
![]()
[Windows]
一開始需要先安裝 Git for Windows (mysysgit)。安裝過程中,可以都用預設,唯一可以自己更改安裝的路徑,需要自己去注意一下。
安裝好之後,回到 Windows 桌面,並點滑鼠右鍵,這時會多一個:Git Bash here 的選項可以選擇。接著可以執行下面的步驟:
cd ~
git clone https://github.com/git-ftp/git-ftp git-ftp.git
cd git-ftp.git && chmod +x git-ftp
cp ~/git-ftp.git/git-ftp /bin/git-ftp
可以參考下面安裝示意圖:

[使用方法]
[init] 第一次把專案透過 git-ftp 放到 FTP/FTPS sever 上。
git-ftp init -u "your-account-name" -p "your-password" - ftpes://peter.nctu.me/web/peter.nctu.me/public_html/hello-world
[push] 已經 init 過,需要去更新 server 上面的檔案(使用 push 推上更新過後的 commit git-ftp 會自己自動比對版本做更新檔案的動作。)
git-ftp push -u "your-account-name" -p "your-password" - ftpes://peter.nctu.me/web/peter.nctu.me/public_html/hello-world
[.gitignore 問題] 若是有些 library 檔案,像使用 PHP Composer 則需要去控制 dependency package. 這些 package 並不會進到版本控制中。而且在用 git-ftp 時,
也會參考 .gitignore 的檔案。若要解決這個問題,需要在專案的目錄底下新增:.git-ftp-include 作為宣告,這一些檔案或目錄,需要一併 push 上去。
下面是 .git-ftp-include 的內容。(當然這個檔案也可以加到版本控制中,讓人方便部署,也知道該部署什麼額外的目錄上去。)
!vendor/
!token/
!bower_components/
這樣之後在 push 的時候,就不會因為 library 目錄 被 ignore 而去忽略沒有上傳到了。
2018/01/18 更新
更新關於使用git-ftp走sftp協定來部署的方式。
git-ftp如果要走sftp的協定做部署的話,需要預先安裝好libcurl-dev以供支援。
可以的話,也可以順便把curl套件安裝起來,因為這是一個蠻好用的指令在對網址請求的時候很好使用。下面預先假設是用Linux Ubuntu 16.04作為示範。
在執行安裝套件之前,都先需要更新鏡像的來源:
sudo apt-get update
安裝curl套件
sudo apt-get install curl
安裝libcurl-dev
sudo apt-get install lib-curl-dev
這個時候,會跳出這是一個虛擬套件的名稱等字樣,如下圖所示:
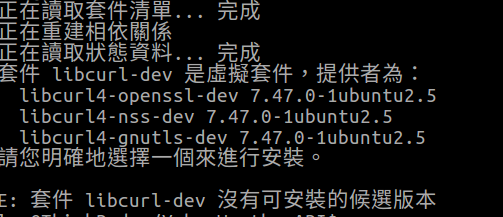
我們選圖中第一個作為我們要安裝的套件名稱。
sudo apt-get install libcurl4-openssl-dev
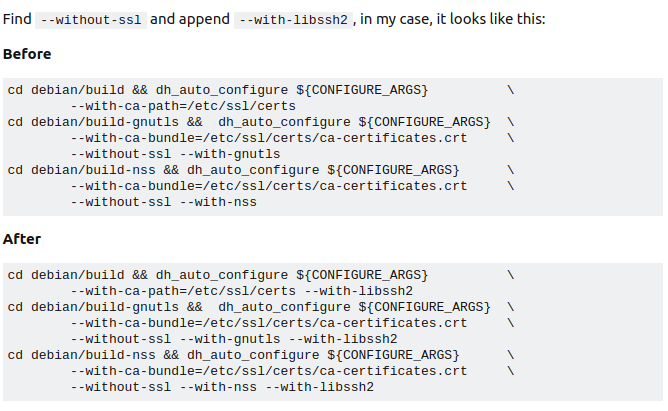
接下來按照下面的指令步驟去執行,到編輯rules檔案時為止。
在rules檔案編輯,我們依照下列圖片中的方式進行編輯:
注意
有一點需要注意的是,因為重新編譯curl時所需要用到的openssl為舊版的。
使用新版的時候,在rebuild-package的時候會不成功。因此需要將openssl版本降級。下列是相關的原因。
against OpenSSL 1.1.0. This won’t work. You need 1.0.2 or earlier. The OpenSSL guys changed the API on 1.1.0.
若沒有把openssl的套件版本降級的話,將會出現像下列那樣的錯誤:
dereferencing pointer to incomplete type ‘EVP_PKEY {aka struct evp_pkey_st}’
if (pk->type == EVP_PKEY_RSA &&
降級openssl 相關package的方法
# 在第24行時,先去確認openssl版本是否為1.0.2的版本,若不是,需要做下面降級的動作

apt-get update

apt-get install openssl=1.0.2g-1ubuntu4.10

apt-get install libssl-dev=1.0.2g-1ubuntu4.10

apt-get install libssl1.0.0=1.0.2g-1ubuntu4.10

# 接著在從build_sftp_curl.sh中的第25行繼續
最後檢查curl是否有支援sftp協定,如果有的話,會像下面的示意圖一樣,在protocols那裡多了一個叫做:『sftp』
測試是否可以正常運行
試著執行下面的命令
git-ftp init -u "user-name" -p "your-password" - sftp://45.77.107.31/home/root
萬一有錯誤的話,但是錯誤的資訊太少,則可以加入下列參數加以使用,並看到更多的訊息。
git-ftp init -u "user-name" -p "password" - sftp://45.77.107.31/home/root -vv
如果正常的話,就可以下面的截圖一樣,成功的把專案部署到指定的server上了。
更新重新編譯cURL方法(2020/06/27)
上述的方法是將相關的工具在Host上的主機做編譯與安裝相關的需要的套件。
如果沒有要汙染本來的Host上的作業系統環境的話,可以使用Docker建置image做為執行cURL指令環境。
並可以參考下面的案專來進行使用:
https://github.com/peter279k/ubuntu-curl-sftp
使用方式如下:
首先,先將此專案用下面指令把它複製回來:
git clone https://github.com/peter279k/ubuntu-curl-sftp
接著,假設Host主機上的作業系統已經有Docker指令,因此可以直接使用下列的指令:
docker build -t ubuntu-curl-sftp .
建置好之後,可以直接使用下面的指令將Docker container跑起來:
docker run -it ubuntu-curl-sftp bash
接著,就有支援SFTP的cURL指令了。
參考資料
- https://github.com/peter279k/ubuntu-curl-sftp
- https://www.digitalocean.com/community/tutorials/how-to-install-and-use-docker-on-ubuntu-18-04
- https://gist.github.com/peter279k/eb0a98a1836513795e24e9bbfd3a18f3