前言
- 如果有看過這篇文章,就知道該如何申請自然人憑證。
- 本文章,是要帶各位如何在Ubuntu 18.04上面使用自然人憑證。
- 並透過自然人憑證讓讀卡機讀的到之外,也跟自然人憑證所出的跨平台網元件可以結合。
前置作業
在開始這篇文章的安裝與設定步驟之前,需要達到下列的事情:
- 要有一張自己申請的自然人憑證。
- 一台主機,Ubuntu 18.04。
- 一台讀卡機,本篇文章所使用的型號為:虹堡科技的 EZ100PU,廠商有提供驅動程式
安裝讀卡機驅動
首先,到此網站,則會看到下面的頁面,如下面截圖:
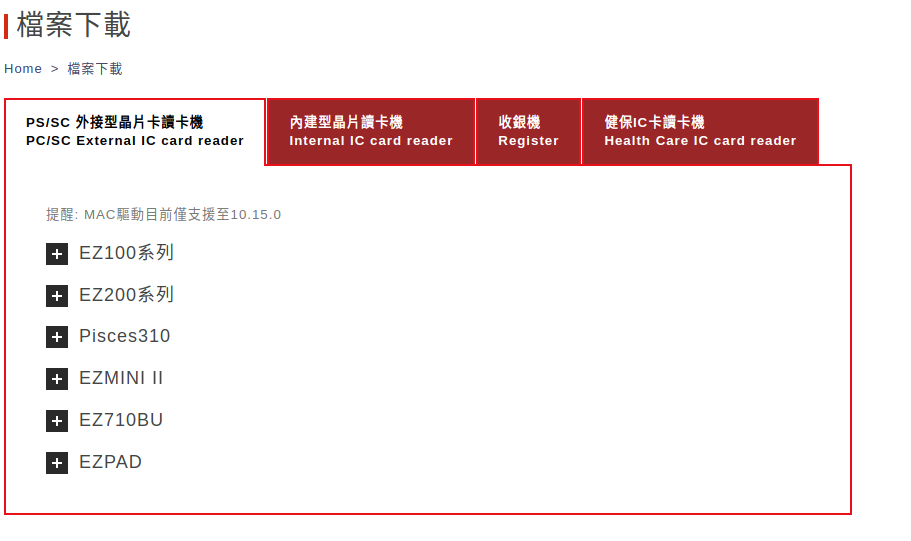
因為本文章是使用的型號為「EZ100PU」,接著把上面截圖中的「EZ100系列」的欄位展開,就會得到下面的截圖:
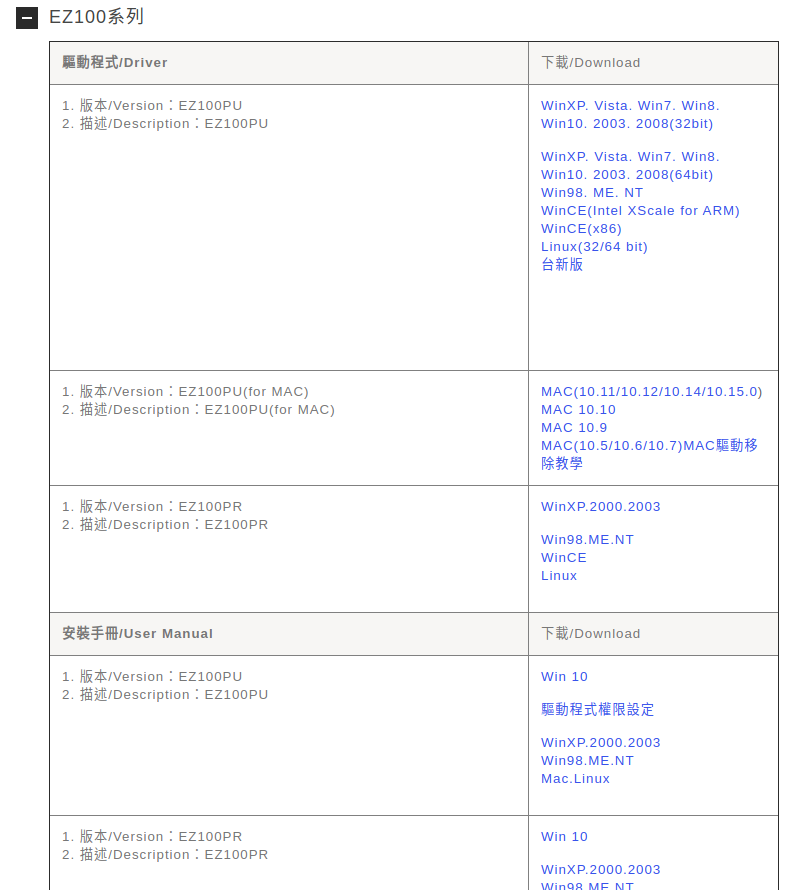
我們從上面的截圖可以看到,第一個攔位的右邊有一個名叫做「Linux(32/64 bit)」的連結,接著點下去就會下載一個檔名叫做:「201511920271676073.zip」的ZIP壓縮檔。
如下截圖:

接著把這個壓縮檔做解壓縮就會得到一個叫做「EZUSB_Linux」的資料夾。接著打開這個資料夾裡面會有兩個ZIP壓縮檔:
- EZUSB_Linux_x86_64_v1.5.3.zip
- EZUSB_Linux_x86_v1.5.3.zip
依照個人安裝的作業系統的位元做選擇,像是我是安裝64位元的所已就選上面列出的第一項目。
接著把這個壓縮檔做解壓縮,得到下面的資料夾:「EZUSB_Linux_x86_64_v1.5.3」點擊進去之後,裡面有個名叫「driver_ezusb_v1.5.3_for_64_bit」的資料夾。
裡面有這些檔案如下截圖:
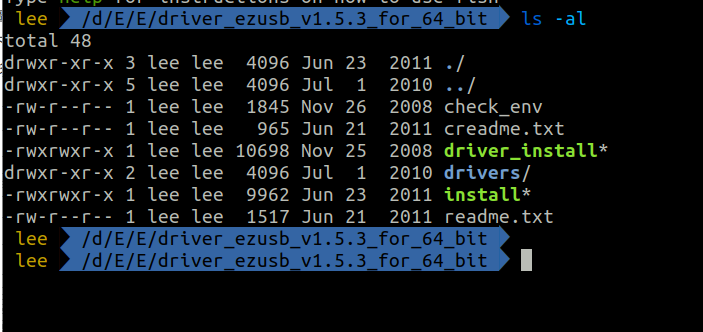
接著使用「./install」執行「install」這個shell script,就會發現下面的警告訊息:
USB Device File System Ready!
Warning! Cannot Find PC/SC Daemon!
Please install PC/SC Lite from Website http://www.linuxnet.com
No PC/SC Driver Location Found!
Use default PC/SC Driver Location -/usr/local/pcsc
上述的訊息指的是沒有安裝PC/SC的套件,因此在執行安裝讀卡機之前,需要安裝此套件。
透過下面的指令安裝必要的套件:
# 更新鏡像來源

sudo apt-get update

# 安裝必要的PC/SC套件

sudo apt-get install pcscd pcsc-tools
安裝完成之後,需要重新開機,接著把電腦重新開機,透過下面的指令:
sudo systemctl reboot
安裝完成之後,需要重新開機,重新開機完成之後,再繼續執行下面的shell script:
./install
接著就會得到下面的訊息:
/dev/bus/usb Detected
USB Device File System Ready!
PC/SC Daemon Found!
PC/SC Driver Location - /usr/lib/pcsc
Driver Already Exists! Do you want to overwrite? (y/n)
y
[sudo] password for lee:
Reader Installation Successfully!
Please reboot your system!
會得到上述的訊息是因為我之前已經有安裝過一次了,所以會出現問說要不要把原本的檔案覆蓋過去,我這邊就輸入「y」讓檔案覆寫過去。
當然,這邊還是會跳出請重新啟動系統。那也就按照指示重新啟動系統。
到這裡,驅動程式就安裝完成了,接者把自然人憑證的卡片插上去。
並輸入下面的指令:
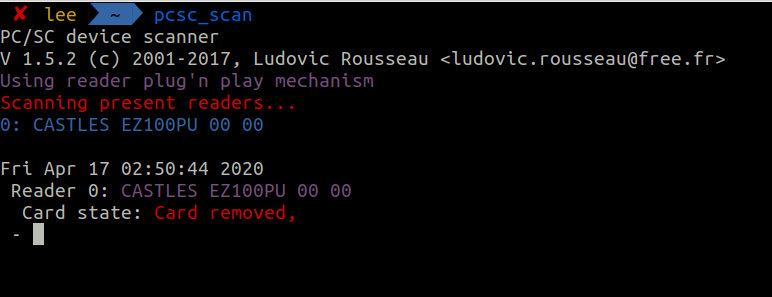
pcsc_scan
接著就會開始啟動讀卡機讀卡的機制了。
讀取卡片的期間圖示:(卡片已經移除)
讀取卡片,卡片已經讀到並印出一些訊息:
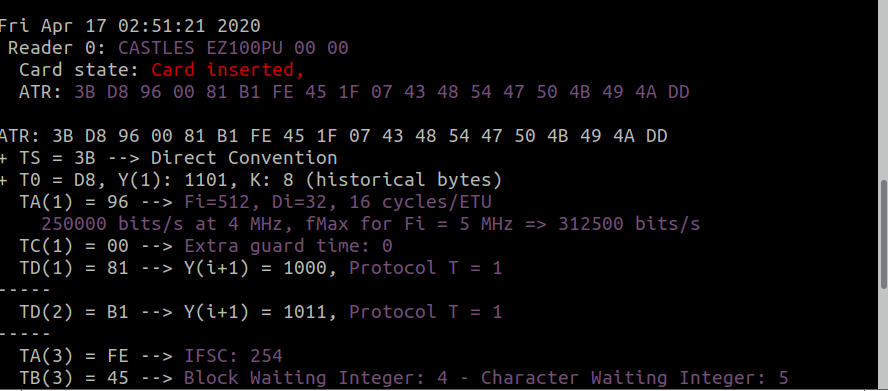
把上述截圖的整串訊息拉到最下面會出現幾個訊息:

上述截圖的訊息中,有幾個訊息值得注意:
- Possibly identified card (using /home/lee/.cache/smartcard_list.txt):
3B D8 96 00 81 B1 FE 45 1F 07 43 48 54 47 50 4B 49 4A DD
Citizen Digital Certificate, Taiwan (PKI)
http://moica.nat.gov.tw/
上述代表讀到的是自然人憑證的卡片,並印出相關的發卡單位等訊息,這是從smart_card文字清單中找到對應的SHA的雜湊訊息摘要。
並從對應的訊息中比對出這張插入的卡片為自然人憑證。
下載與安裝自然人憑證的元件
- 使用自然人憑證,需要額外下載「HiPKILocalSignServerApp.tar.gz的壓縮檔」,這個可以從這個網址下載的到。
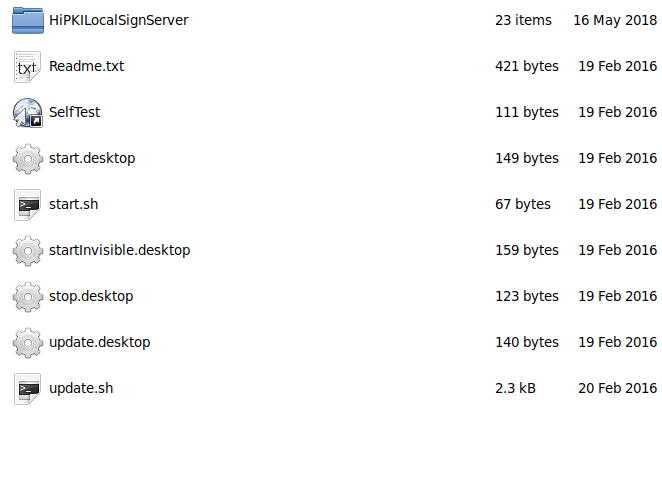
- 下載完成之後,將其解壓縮,會得到名叫「HiPKILocalSignServerApp」這個目錄。裡面有這些檔案,如下的截圖:
裡面有個叫做「Readme.txt」的檔案,打開之後,內容是用英文寫的,如下這個樣子:
GPKI cross browser component for smartcard digital signature

Use StartServer or start.sh to start the component with Terminal screen.
Use StartServerInvisible to start the component without Terminal screen.
Use StopServer to stop the component.
Use Update or update.sh to check if there is update for the component.
Use SelfTest or browse http://localhost:61161/selfTest.htm to check if the component works fine.
意思就是安裝的步驟,首先要打開一個終端機的視窗,並切換到這個目錄底下,裡面的目錄所有檔案訊息如下截圖:
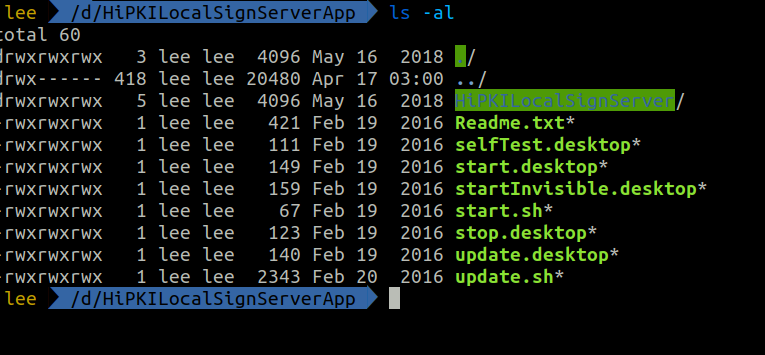
迷之音:全部權限都是777是正常的嘛XD連一般的Readme.txt文字檔都是777是怎樣….
Use StartServer or start.sh to start the component with Terminal screen.
- 執行StartServer或是使用「start.sh」的shell script,「StartServer」應該是「StartServer.desktop」。打開這個檔案也是執行「start.sh」的shell script
- 執行「start.sh」的話,順便開啟這個shell script來看:
#!/bin/bash
cd HiPKILocalSignServer
pwd
./node hipkiLocalServer.js
看來這個啟動就是當前這個目錄底下的「HiPKILocalSignServer」並切換過去執行此目錄底下的「node」執行「hipkiLocalServer.js」,別懷疑,這個還自帶Node.js,版本是「v5.6.0」
還有一個「node_modules」的資料夾,連相依套件都一起收錄了。也可以順便看看「hipkiLocalServer.js」程式是怎麼啟動這個server的…..
裡面的port number也是寫死的,61161,所以如果有其他的服務已經監聽這個埠號的話,埠號的錯誤的話會直接跳出來。
一定要掛在「61161」上面,其他系統也是只會向這埠號上的網址發送請求驗證自然人憑證元件是否有安裝確實。
![]()
執行「start.sh」之後,就會跑一個Node.js server起來了,並監聽在:「Server has started at 127.0.0.1:61161」上面。
![]()
Use StartServerInvisible to start the component without Terminal screen.
- 執行「StartServerInvisible.desktop」這個是不用終端機的畫面啟動server,如果上面步驟已經透過終端機畫面啟動server的話,這一步可以跳過。
Use StopServer to stop the component.
- 這一步其實就是把上面步驟所啟動的node process給砍掉,當然也可以自己手動停掉。
- 就把啟動的「start.sh」的process id找出來並砍掉也是可以。
Use Update or update.sh to check if there is update for the component.
- 這一步是使用「Update.desktop」或是「update.sh」執行這個「HiPKILocalSignServerApp」所有元件的更新。
「update.sh」檔案內容如下:
#!/bin/bash
#export http_proxy=10.160.3.88:8080
wget -O temp.sha256 -o /dev/null http://api-hisecurecdn.cdn.hinet.net/HiPKILocalSignServer/update/linux/x64/HiPKILocalSignServer.tar.gz.sha256
#wget --ca-certificate=GRCA2.crt -O temp.sha256 -o /dev/null http://192.168.111.1:8080/linux/HiPKILocalSignServer.tar.gz.sha256
if ! [ $? -eq 0 ]; then
	wget --ca-certificate=HiPKILocalSignServer/GRCA2.crt -O temp.sha256 -o /dev/null https://gpkiapi.nat.gov.tw/HiPKILocalSignServer/update/linux/x64/HiPKILocalSignServer.tar.gz.sha256
	if ! [ $? -eq 0 ]; then
		echo "Download digest file failed"
		read -p "Press enter to continue"
		exit $?
	fi
fi
	echo "Successful download digest file"
diff temp.sha256 HiPKILocalSignServer.tar.gz.sha256 > /dev/null
if [ $? -eq 0 ]; then
	echo "No update available"
	rm temp.sha256
	echo "Update end"
	read -p "Press enter to continue"
	exit 0
fi
echo "Update available!"
read -p "Do you want to update?" yn
if [ "${yn}" != "Y" ]&&[ "${yn}" != "y" ]; then
	echo "User terminate"
	read -p "Press enter to continue"
	exit 0
fi
wget -O HiPKILocalSignServer.tar.gz -o /dev/null http://api-hisecurecdn.cdn.hinet.net/HiPKILocalSignServer/update/linux/x64/HiPKILocalSignServer.tar.gz
if ! [ $? -eq 0 ]; then
	wget --ca-certificate=HiPKILocalSignServer/GRCA2.crt -O HiPKILocalSignServer.tar.gz -o /dev/null https://gpkiapi.nat.gov.tw/HiPKILocalSignServer/update/linux/x64/HiPKILocalSignServer.tar.gz
	if ! [ $? -eq 0 ]; then
		echo "Download update file failed"
		read -p "Press enter to continue"
		exit $?
	fi
fi
echo "Successful download update file"
openssl dgst -sha256 -out caculated.sha256 HiPKILocalSignServer.tar.gz
diff temp.sha256 caculated.sha256 > /dev/null
isMatch=$?
rm caculated.sha256
echo $isMatch
if [ $isMatch -eq 0 ]; then
	echo "Digest verified"
else
	echo "Unable to verify file"
	read -p "Do you want to continue update?" yn
	if [ "${yn}" != "Y" ]&&[ "${yn}" != "y" ]; then
		echo "User terminate"
		read -p "Press enter to continue"
		exit 0
	fi
fi

kill $(pidof node) > /dev/null
tar xvfz HiPKILocalSignServer.tar.gz > /dev/null
rm HiPKILocalSignServer.tar.gz
if [ $? -eq 0 ]; then
	echo "Successful update file"
else
	echo "Update file failed"
	read -p "Press enter to continue"
	exit $?
fi

mv temp.sha256 HiPKILocalSignServer.tar.gz.sha256
echo "Update end"
read -p "Press enter to continue"
大致上做的事情就是:
- 下載此壓縮檔的訊息摘要,並比較當前的跟下載的,如果訊息摘要不同就代表要更新新版的
- 如果需要更新新版的,那就下載壓縮檔並解壓縮把當前的檔案與目錄覆蓋掉
- 更新檔案中途就有一些確認與檢查是否更新成功,反之就印出失敗的訊息
- 當檔案與附錄都順利更新(覆寫)之後,就會把原本用Node.js跑得server砍掉,如下上面「update.sh」中某行的指令:
- kill $(pidof node) > /dev/null
- 不過上面這行指令有個問題,如果當系統上有兩個Node.js的process的時候,這行指令會有問題,因為後面的「pidof node」會得到兩個以上並排的process id,如下:
- 舉例,如果有兩個以上Node.js的process id則會得到「14432 6935」,這會導致kill指令出問題:「kill: failed to parse argument: ‘14432 6935’」。
- 修改的方向為:可以利用「ps」指令搭配「grep」去抓到確切執行這個JS檔案。並使用「awk」指令拿到確切的process id。舉例如下:
ps aux | grep ‘./node hipkiLocalServer.js’ | head -n 1 | awk ‘{print $2}’ - 萬一有關鍵字是一樣的話,上述這個做法還是會拿到兩個以上,比較保險的作法就是,拿到這些的process id都砍掉,這樣誤砍機率會較小,也不會出錯。
Use SelfTest or browse http://localhost:61161/selfTest.htm to check if the component works fine.
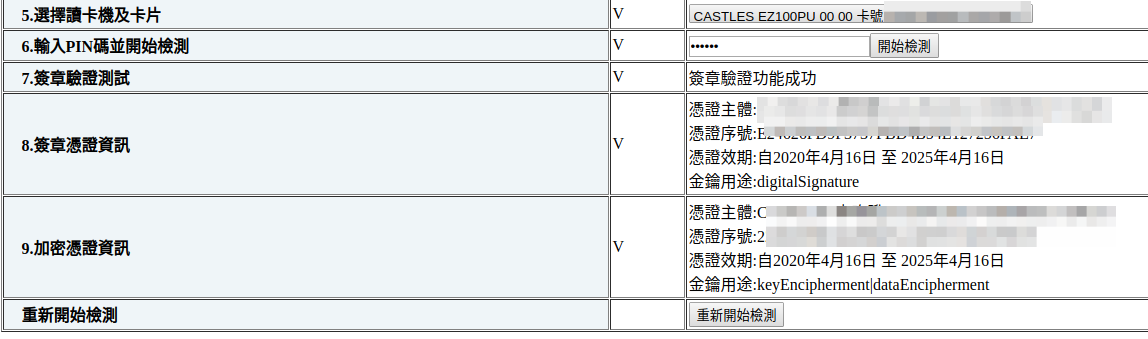
在「Readme.txt」之最後一步,就是做測試,打開這個網站,就會看到頁面,如下截圖:
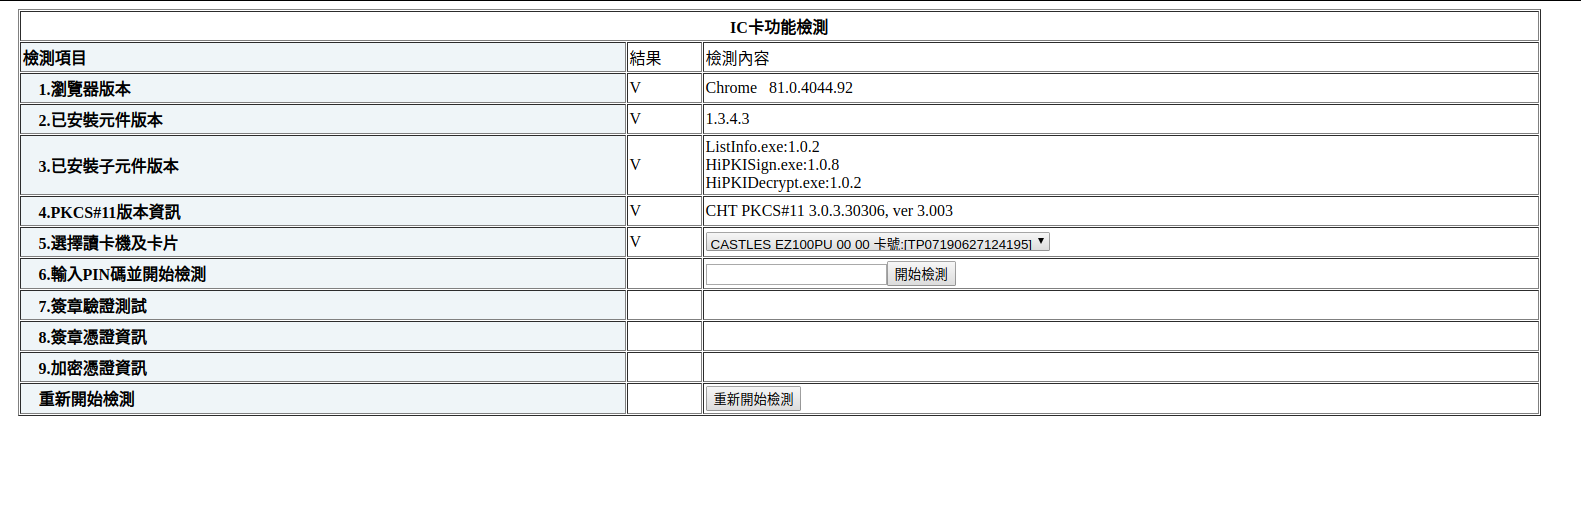
就是很簡單的網頁,裡面有一些自然人憑證client端工具相關的訊息,並有個欄位寫說,「6.輸入PIN碼並開始檢測」,於是就輸入PIN碼並下「開始檢測」按鈕。
P.S. 首次拿到的PIN碼為:
例如:生日為73 年1 月1 日,卡片密碼預設將為730101(舉例)
(為了保障您個人權益,請先至內政部憑證管理中心專屬網站進行密碼變更)
- 用戶需牢記IC卡PIN碼,並妥善保管及使用私密金鑰,不要隨意告知他人。
- PIN(Personal identification number)碼為個人身份確認碼。
檢測失敗則會跳出這個訊息:
![]()
檢測成功則會跳出這個訊息:
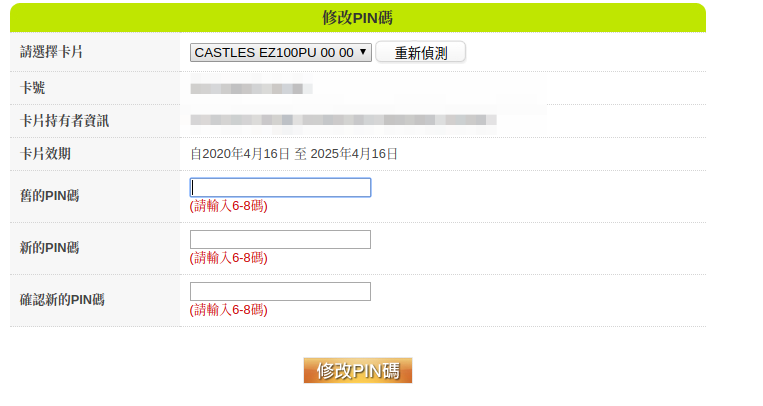
修改PIN碼
可以到這個網站修改PIN碼,網站憑證好像沒有辦驗證過去?呈現紅色的,不過沒關係就只好按下我信任繼續瀏覽這個網站。
接下來,需要選擇讀卡機型號之外,按下開始檢測,就可以看到相關訊息從卡片裡面讀取出來,相關截圖如下:
不過似乎修改PIN碼目前只支援「Windows」與「MAC」作業系統,「Linux」作業系統只支援讀取。所以只能切換到另外兩個系統並下載「HiCOS卡片管理工具」並安裝。
結語
- 「Linux」系統上,自然人憑證只能拿來讀取與使用,還要自己手動做很多事情不支援更改卡片上的一些內容,如果是改卡號,是可以支援的。
- 如果是自然人憑證上的「修改PIN碼」則不支援。
參考資料
- https://moica.nat.gov.tw/pin_modi.html
- https://medium.com/@ywchen88/ubuntu-%E5%A0%B1%E7%A8%85-dfe94f63afad
- https://moica.nat.gov.tw/rac_plugin.html