前言
在使用Ubuntu系列之Linux發行版中,每個版本預設是有安裝Firefox瀏覽器,但是有的時候使用者比較常使用Google Chrome瀏覽器,並且會依照自己的需求進行下載與安裝。
在本篇文章中,會展示在不同的Ubuntu之發行版本上進行Google Chrome瀏覽器的安裝方法。
安裝方法
方法1
要在Ubuntu上面安裝Google Chrome瀏覽器主要有兩種方法,相關的法描述如下:
- 到Google Chrome官網進行下載,網站為:https://www.google.com/chrome/,進去之後可以看如下的網站畫面:

- 接著點選上述畫面的「Download Chrome」之按鈕,則會跳出下列的視窗:
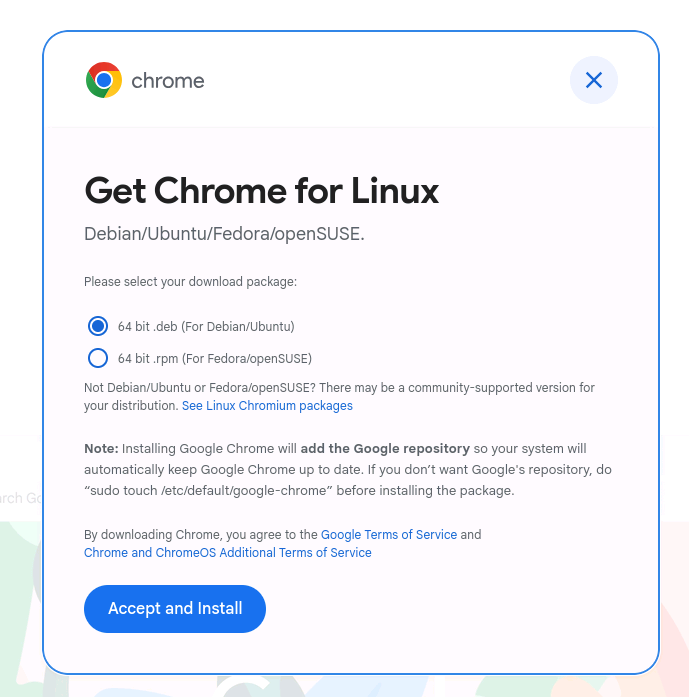
- 這時候就選擇合適的套件安裝檔,並按下「Accept and Install」按鈕之後就會開始進行下載了。
- deb檔就是給Debian與Ubuntu的發行版作使用的;而rpm檔則是給Fedora與RedHat的發行版使用的。
- 下載回來的安裝檔如果是deb檔的話,則會像是「google-chrome-stable_114.0.5735.198-1_amd64.deb」這樣的檔案。
- 接著使用「dpkg -i google-chrome-stable_114.0.5735.198-1_amd64.deb」的指令進行安裝即可。
方法2
除了上述的安裝方法之外,也可以透過「apt-get」的指令方式進行Google Chrome瀏覽器的安裝,這方法就是設定與引入第三方套件;例如:像是安裝Docker套件那樣。
因此,需要先下載第三方Google Chrome套件的GPG金鑰,我們可以使用「wget」指令並搭配「apt-key」指令進行下載與匯入GPG金鑰之動作:
# 適合Ubuntu  20.04以前的發行版本,使用apt-key進行匯入管理

wget -q -O - https://dl.google.com/linux/linux_signing_key.pub | sudo apt-key add -

# 建議Ubuntu 22.04 以後的發行版本的方法,但也適用Ubuntu 22.04以前的版本,使用gpg進行匯入與管理

curl -fsSL https://dl.google.com/linux/linux_signing_key.pub | sudo gpg \
--dearmor -o /usr/share/keyrings/google_chrome_signing_key.gpg
若遇到GPG金鑰已經存在的時候,若是使用「apt-key」進行管理,則可以使用下列的方式將先前匯入的金鑰進行查詢與刪除:
sudo apt-key list

# 假設本來的GPG public key為:"EB4C 1BFD 4F04 2F6D DDCC EC91 7721 F63B D38B 4796"且要進行刪除:

sudo apt-key del "EB4C 1BFD 4F04 2F6D DDCC EC91 7721 F63B D38B 4796"
新增完成第三方需要安裝的套件的GPG金鑰之後,接著可以使用下列的方式進行Google Chrome套件鏡像來源的設定,相關的設定指令如下:
# 設定鏡像來源的網址

# 以下方法是使用apt-key指令匯入GPG金鑰時設定的方式

echo "deb [arch=amd64] https://dl.google.com/linux/chrome/deb/ stable main" | sudo tee /etc/apt/sources.list.d/google-chrome.list

# 以下方法是使用gpg指令匯入GPG金鑰指令時設定的方式

echo "deb [arch=amd64 signed-by=/usr/share/keyrings/google_chrome_signing_key.gpg] https://dl.google.com/linux/chrome/deb/ stable main" | sudo tee /etc/apt/sources.list.d/google-chrome.list

# 設定完成之後,使用sudo apt-get update指令進行更新鏡像來源相關的資訊

$ sudo apt-get update
Get:1 file:/.qnap/packages/local-repo stable InRelease [3,320 B]
Get:1 file:/.qnap/packages/local-repo stable InRelease [3,320 B]
Get:2 https://dl.google.com/linux/chrome/deb stable InRelease [1,825 B]
Hit:3 https://download.docker.com/linux/ubuntu jammy InRelease
Hit:4 http://archive.ubuntu.com/ubuntu jammy InRelease
Hit:5 http://security.ubuntu.com/ubuntu jammy-security InRelease
Get:6 https://dl.google.com/linux/chrome/deb stable/main amd64 Packages [1,213 B]
Hit:7 http://archive.ubuntu.com/ubuntu jammy-updates InRelease
Hit:8 http://archive.ubuntu.com/ubuntu jammy-backports InRelease
Fetched 1,213 B in 2s (678 B/s)
Reading package lists... Done
從上述的輸出訊息可以得知,鏡像已經更新完成,並能夠進行Google Chrome瀏覽器的安裝了,接著可以透過列的方式進行相關Google Chrome瀏覽器的安裝:
$ sudo apt-get install -y google-chrome-stable

Reading package lists... Done
Building dependency tree... Done
Reading state information... Done
The following NEW packages will be installed:
google-chrome-stable
0 upgraded, 1 newly installed, 0 to remove and 0 not upgraded.
Need to get 114 MB of archives.
After this operation, 371 MB of additional disk space will be used.
Get:1 https://dl.google.com/linux/chrome/deb stable/main amd64 google-chrome-stable amd64 133.0.6943.141-1 [114 MB]
Fetched 114 MB in 10s (11.3 MB/s)

......

Processing triggers for gnome-menus (3.36.0-1ubuntu3) ...
Processing triggers for man-db (2.10.2-1) ...
Processing triggers for mailcap (3.70+nmu1ubuntu1) ...
Processing triggers for desktop-file-utils (0.26-1ubuntu3) ...
從上述的安裝指令與相關執行的輸出訊息可以得知,已經將Google Chrome瀏覽器安裝完成了,接著可以使用下列的指令進行檢查安裝的Google Chrome瀏覽器之版本:
$ google-chrome-stable --version
Google Chrome 133.0.6943.141
這樣我們就完整的完成Google Chrome瀏覽器的安裝與設定了。
參考資料
- 從Ubuntu 22.04以後的版本設定與匯入GPG金鑰
- 安裝Google Chrome之方法,包含Ubuntu 20.04以前的版本設定與匯入GPG金鑰