前言
在之前,我在Ubuntu上新增PPA的方式都是使用「add-apt-repository」指令來新增與刪除PPA的儲存庫,但是都沒有好好的研究該如何從APT儲存庫移出。
本文章,我整理了幾種方式在Ubuntu上面新增與刪除APT除存庫的方法。
適用的Ubuntu版本如下:
- Ubuntu 16.04
- Ubuntu 18.04
指令自動新增PPA
Personal Package Archives (PPA)為私人的套件儲存庫來源,並允許放到Launchpad的網站上。一般來說,大部分的網站都會使用下列的指令來匯入一個指定的私人APT儲存庫,下面以ondrej/php為例:
sudo add-apt-repository ppa:ondrej/php
要用上面這個指令之前,需要用下面的指令安裝好:
sudo apt-get update

sudo apt-get install -y software-properties-common
將上述的指令安裝好之後,就有add-apt-repository指令可以使用了,在新增APT儲存庫的過程中,會有下列的詢問訊息:
Co-installable PHP versions: PHP 5.6, PHP 7.x and most requested extensions are included. Only Supported Versions of PHP (http://php.net/supported-versions.php) for Supported Ubuntu Releases (https://wiki.ubuntu.com/Releases) are provided. Don't ask for end-of-life PHP versions or Ubuntu release, they won't be provided.

Debian oldstable and stable packages are provided as well: https://deb.sury.org/#debian-dpa

You can get more information about the packages at https://deb.sury.org

IMPORTANT: The backports is now required on older Ubuntu releases.

BUGS FEATURES: This PPA now has a issue tracker:
https://deb.sury.org/#bug-reporting

CAVEATS:
1. If you are using php-gearman, you need to add ppa:ondrej/pkg-gearman
2. If you are using apache2, you are advised to add ppa:ondrej/apache2
3. If you are using nginx, you are advised to add ppa:ondrej/nginx-mainline
or ppa:ondrej/nginx

PLEASE READ: If you like my work and want to give me a little motivation, please consider donating regularly: https://donate.sury.org/

WARNING: add-apt-repository is broken with non-UTF-8 locales, see
https://github.com/oerdnj/deb.sury.org/issues/56 for workaround:

# LC_ALL=C.UTF-8 add-apt-repository ppa:ondrej/php
More info: https://launchpad.net/~ondrej/+archive/ubuntu/php
Press [ENTER] to continue or ctrl-c to cancel adding it
從上述的訊息來看,前面都是一些這個APT儲存庫的作者所告知的事情,最後一行比較重要:Press [ENTER] to continue or ctrl-c to cancel adding it,這行就是詢問是否將這個外部的APT儲存庫加入到本地端主機,若要的話,則按下「enter」鍵之後就會開始進行APT儲存庫設定。
會做的APT儲存庫設定如下:
- 將APT儲存庫的金鑰匯入
- 新增ondrej-ubuntu-php-bionic.list.save檔案
- 新增ondrej-ubuntu-php-bionic.list檔案
- 上述檔案內容為:
- deb http://ppa.launchpad.net/ondrej/php/ubuntu bionic main
deb-src http://ppa.launchpad.net/ondrej/php/ubuntu bionic main - bionic為Ubuntu發行版本的代號
- 將上述檔案儲存到/etc/apt/sources.list.d/之目錄中
指令刪除PPA
當使用上述的指令將ondrej/php之APT儲存庫新增之後,接下來就是刪除的動作了。
首先,可以使用下列的方式將指令刪除:
sudo add-apt-repository --remove ppa:ondrej/php
不過要注意的是,上述這個指令只會將ondrej-ubuntu-php-bionic.list.save與ondrej-ubuntu-php-bionic.list檔案裡面的內容進行刪除。
檔案還是會保留下來,不過裡面的內容是空的。
若要把匯入的GPG金鑰給移除的話,還需要搭配下列的指令完成:
sudo apt-key list | less
上述的指令意思為,使用apt-key指令並搭配list參數將所有GPG金鑰列表列出,並將金鑰列出來之後,使用|把前面輸出的金鑰列表轉給less編輯器。
可以使用下圖所列出的方式找到ondrej/php所使用的GPG金鑰:
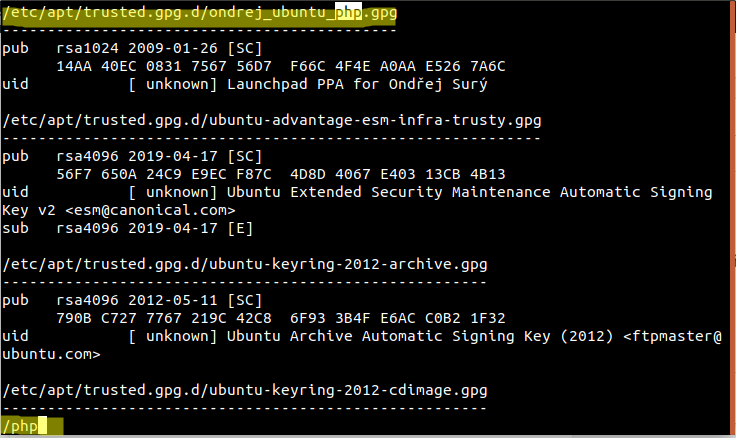
上圖的用法為,先輸入「/」之後,接著輸入「php」並按下「enter」鍵,即可將有這個關鍵字的GPG金鑰的資訊列表給列出來,若要退出less編輯器的模式,則可以按下「q」鍵。
GPG公開金鑰的完整資訊如下:
/etc/apt/trusted.gpg.d/ondrej_ubuntu_php.gpg
--------------------------------------------
pub rsa1024 2009-01-26 [SC]
14AA 40EC 0831 7567 56D7 F66C 4F4E A0AA E526 7A6C
uid [ unknown] Launchpad PPA for Ondřej Surý
其中,上述所有資訊的「14AA 40EC 0831 7567 56D7 F66C 4F4E A0AA E526 7A6C」這一行就是這個APT儲存庫的GPG公開金鑰。
找到這行之後,就可以使用下列的指令將此APT儲存庫的GPG公開金鑰給移除:
sudo apt-key del "14AA 40EC 0831 7567 56D7 F66C 4F4E A0AA E526 7A6C"
移除完成之後,會顯示「OK」的訊息,而因為ondrej-ubuntu-php-bionic.list與ondrej-ubuntu-php-bionic.list.save之二個檔案在/etc/apt/sources.list.d/目錄中,兩個檔案內容會是空的。那要更完整移除的話,則要將此檔案用rm指令的方式將此移除:
sudo rm /etc/apt/sources.list.d/ondrej-ubuntu-php-bionic.list.save

sudo rm /etc/apt/sources.list.d/ondrej-ubuntu-php-bionic.list
手動新增PPA
介紹完自動新增PPA之後,接下來要介紹手動新增的方式了,首先可以先到APT儲存庫的網站,這邊以ondrej/php為例,我們可以進到這個網站:https://launchpad.net/~ondrej/+archive/ubuntu/php,進去之後,可以看到網頁中有個內容,相關內容如截圖所示:
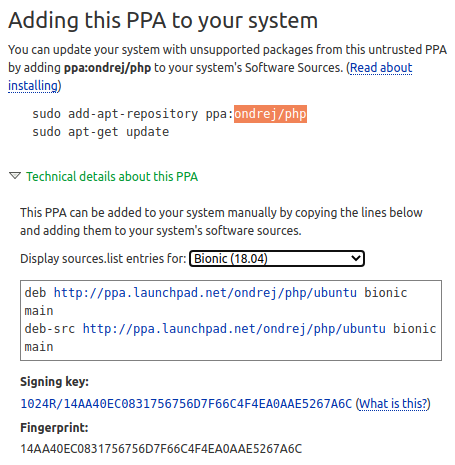
從上圖的內容得知,會教如何將此APT儲存庫存到本地的主機中,而最上面的兩行指令,就是先前所提到的,利用自動的方式將APT儲存庫給加入到本地主機中。那下面有個綠色的「Technical details about this PPA」,除了技術細節描述加入PPA之APT儲存庫之外,就是以手動的方式新增PPA的方法:
- 先選擇發行版本的名稱,可以從「Display sources.list entries for」這行後面的下拉選單以選擇Ubuntu的發行版本代號。這邊以「Bionic 18.04」為例
- 接著,就會看到有兩行文字:
- deb http://ppa.launchpad.net/ondrej/php/ubuntu bionic main
deb-src http://ppa.launchpad.net/ondrej/php/ubuntu bionic main
- deb http://ppa.launchpad.net/ondrej/php/ubuntu bionic main
- 我們可以利用上述兩行的文字內容把它放到一個名為「ondrej-ubuntu-php-bionic.list」中,當然這邊的檔案名稱可以自行命名是沒問題的。
- 上述的檔案建立好並將那兩行內容放到此檔案之後,就可以移到「/etc/apt/sources.list.d/」的目錄中。
- 當然,也可以把上述的兩行的文字內容放到「/etc/apt/sources.list」的檔案裡面,那就端看使用者系統管理的習慣了
- 上述的這個方法與上述獨立新增的方法擇一即可,千萬不要兩個都同時設定,否則在執行「sudo apt-get update」指令進行更新外部鏡像儲存庫時,會造成duplicate鏡像位址設定的訊息發生。
- 上述重複定義鏡像網址的警告訊息如下:
- W: Target Packages (main/binary-all/Packages) is configured multiple times in /etc/apt/sources.list:44 and /etc/apt/sources.list.d/ondrej-ubuntu-php-bionic.list:1
將上述的動作擇一完成之後,使用「sudo apt-get update」之後,就會發現有下列的GPG錯誤發生,相關的錯誤訊息如下:
Err:9 http://ppa.launchpad.net/ondrej/php/ubuntu bionic InRelease
The following signatures couldn't be verified because the public key is not available: NO_PUBKEY 4F4EA0AAE5267A6C

W: An error occurred during the signature verification. The repository is not updated and the previous index files will be used. GPG error: http://ppa.launchpad.net/ondrej/php/ubuntu bionic InRelease: The following signatures couldn't be verified because the public key is not available: NO_PUBKEY 4F4EA0AAE5267A6C
W: Failed to fetch http://ppa.launchpad.net/ondrej/php/ubuntu/dists/bionic/InRelease The following signatures couldn't be verified because the public key is not available: NO_PUBKEY 4F4EA0AAE5267A6C
W: Some index files failed to download. They have been ignored, or old ones used instead.
會出現上述的錯誤訊息是因為,GPG金鑰並沒有在主機上,因此需要使用「apt-key」指令將「4F4EA0AAE5267A6C」給匯入進去,可以使用下列的指令來進行完成:
sudo apt-key adv --keyserver keyserver.ubuntu.com --recv-keys 4F4EA0AAE5267A6C
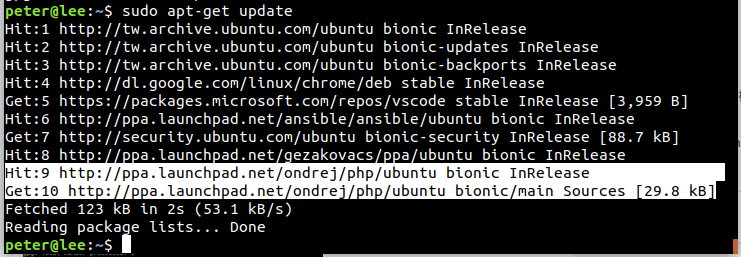
匯入完成之後,會出現下列的圖示:

若有出現上述的圖示,則表示GPG公開金鑰已經匯入完成了。
在匯入完成之後,則可以再次執行「sudo apt-get update」來更新鏡像來源與位址,這樣一來就不會出現錯誤訊息了:
手動刪除PPA
講完手動新增PPA的方式之後,接下來就介紹手動刪除PPA之APT儲存庫了,接著,可以搭配先前刪除APT儲存庫所對應的GPG金鑰的方法並使用rm指令的方式,將PPA相關的儲存庫給完整的刪除,相關的指令如下:
sudo rm /etc/apt/sources.list.d/ondrej-ubuntu-php-bionic.list

sudo apt-key list | less

sudo apt-key del "14AA 40EC 0831 7567 56D7 F66C 4F4E A0AA E526 7A6C"
上述相關的指令功能如下:
- 刪除對應APT儲存庫檔案
- 列出所有儲存庫之GPG金鑰清單
- 刪除APT儲存庫所對應的GPG金鑰
到這裡,自動與手動的方式新增與刪除APT儲存庫的方式都介紹完了。